Pages

Wednesday, April 30, 2014

Peanut Butter Pup Treats

It’s my preppy pooch Chloe’s birthday on Thursday and I almost can’t believe that she will be turning three! It wouldn’t be a party without delectable bites, and I know Chloe and her dog friends will find these peanut butter cookies irresistible. 

Chloe absolutely adores peanut butter, so I decided to make her some Peanut Butter Pup Treats for her upcoming birthday. By combining a few simple ingredients, you’ll have a homemade dog treat that your puppy will love. Rice flour, peanut butter and honey are the main ingredients in this recipe and I love that these treats have all natural ingredients. I myself eat relatively healthy, and use all natural ingredients whenever possible, so it’s important that my pet does too.

As you know I love any excuse to throw a party, and this week we will be celebrating Chloe’s big day in style. It wouldn’t be a party with out cake and a new birthday dress – so stay tuned to see how we’re celebrating Chloe’s 3rd birthday!


Ingredients:
2½ cups organic rice flour
1 teaspoon baking powder
1 cup organic peanut butter
1 cup organic low sodium chicken broth
1 tablespoon organic honey
1 organic egg

Directions:
  1. Preheat oven to 350 F
  2. In a large bowl combine flour, baking powder, and egg. Once combined, add peanut butter, chicken broth, and honey. Stir until dough is stiff.
  3. On a floured surface, roll out the dough about ½ inch thick and use a small cookie cutter to make shapes. I used a small heart shaped cutter.
  4. Bake until golden, approximately 20 minutes.

Thursday, April 24, 2014

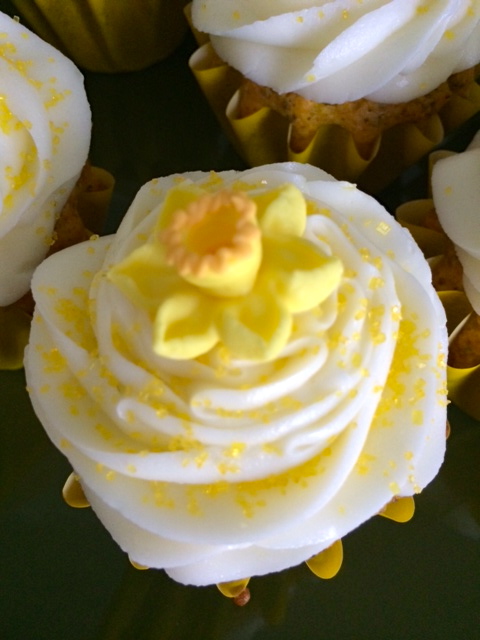
Nantucket's Daffodil Weekend Cupcakes

Daffodil Weekend is one of the most popular and busiest weekends of the year on the island of Nantucket. Crowds gather to watch the annual Antique Car Parade, which is the Festival’s signature event. Vintage cars are decked out in the pretty spring flower, you guessed it… Daffodils. After the parade, residents and visitors make there way to the other side of the island in Sconset, where they have a spring picnic.

For this years Daffodil weekend I decided to cook up some floral themed cupcakes. I thought these cupcakes would be perfect for the occasion as they are simple yet sweet. A lemon poppy seed  cake makes up the base of this cake, which is topped with a lemon flavored butter cream frosting.

It's one of the first signs of spring for the tiny island and people from all over come dressed in their Nantucket Reds, Lilly Pulitzer sundresses and Nantucket basket pocketbooks to celebrate the occasion. Below I posted some throwback photos from the year my family got 1st place. Our theme was "The Big Birthday" as it was my grandmas 60th. We made everything oversized, including us kids, who dressed up as ants to "crawl" all over our oversized picnic! Happy Daffy Weekend Nantucket!

* This recipe is from www.foodnetwork.com, under Lemon Poppy Seed Cupcakes.


Ingredients:
For the Cake:
1 box Lemon Cake Mix
1 (3-1/2-ounce) box lemon pudding mix
1/4 -cup vegetable oil
3 large eggs, lightly beaten
1/4 -cup water
1/4 -cup freshly squeezed lemon juice
2 Tbs. lemon zest
3 Tbs. poppy seeds
For the Frosting:
1/2 -cup unsalted butter, at room temperature
3 cups powdered sugar, sifted
1/4 -cup heavy cream
Juice from half a lemon plus zest
  
Directions:
  1. Combine the cake and pudding mixes in a large bowl, stirring to blend. Add the oil, eggs, water and lemon juice, stirring after each addition. Fold in the lemon zest and poppy seeds until just blended. Spoon the batter evenly into the prepared cupcake tins, about 3/4 full. Bake on the middle oven rack until the tops of the cupcakes spring back to the touch and are not too golden; about 15 minutes. Cool in the pan for 15 minutes, and then allow to cool completely on a wire rack before frosting or decorating.
  2. For the frosting, using a wooden spoon, cream the butter in a large bowl, Add the remaining ingredients, and continue creaming until the frosting is well blended and fluffy. Frost the cupcakes with a small spatula and decorate with the candied lemon strips.


Tuesday, April 22, 2014

Hayes Farm Cinnamon Rolls

One of my most beloved dishes that I served at my Easter brunch this past weekend are these old fashioned cinnamon rolls-- brunch would just not be complete with out them! Gooey, sweet and bursting with cinnamon flavor, these pastries are everything you could want, all rolled up into that perfect pinwheel shape. Topped with a light icing, they are so delectable... I bet you can't just have one!

My Grandma Hayes might just be the best baker I know - the woman can seriously make anything, and whatever that thing is, it's always flawless. I consider myself lucky to have inherited her those 'genes'. Although I still can't make a pie as flakey as hers, or roll my sugar cookie dough as thick, my technique steadily improves, but similar to these cinnamon rolls, it's still not quite as good as Grandmas. I need to go up to the farm soon and have her give me a tutorial, but until then, these will have to do.

What I love about this recipe is that it can be made in advance, so make a bunch one weekend and freeze. Whether you serve these for breakfast or as a dessert, take out as needed and your guests will be so impressed that you had time to make fresh cinnamon rolls. Defrost, heat and serve – It will be our little secret.

*Since this is a secret family recipe I will not be posting the original. I found a very similar one  from Paula Deen, which can be found here.  Enjoy!


Ingredients:
Dough:
1/4 -ounce package yeast
1/2 cup warm water
1/2 cup scalded milk
1/4 cup sugar
1/3 cup butter or shortening
1 teaspoon salt
1 egg
3 1/2 to 4 cups all-purpose flour
Filling:
1/2 cup melted butter, plus more for pan
3/4 cup sugar, plus more for pan
2 tablespoons ground cinnamon
3/4 cup raisins, walnuts, or pecans, optional
Glaze:
4 tablespoons butter
2 cups powdered sugar
1 teaspoon vanilla extract
3 to 6 tablespoons hot water

Directions:
  1. Heat oven to 350 degrees F.
  2. In a small bowl, dissolve yeast in warm water and set aside. In a large bowl mix milk, sugar, melted butter, salt and egg. Add 2 cups of flour and mix until smooth. Add yeast mixture. Mix in remaining flour until dough is easy to handle. Knead dough on lightly floured surface for 5 to 10 minutes. Place in well-greased bowl, cover and let rise until doubled in size, usually 1 to 1 1/2 hours.
  3. When doubled in size, punch down dough. Roll out on a floured surface into a 15 by 9-inch rectangle. Spread melted butter all over dough. Mix sugar and cinnamon and sprinkle over buttered dough. Sprinkle with walnuts, pecans, or raisins if desired. Beginning at the 15-inch side, role up dough and pinch edge together to seal. Cut into 12 to 15 slices. 
  4. Coat the bottom of baking pan with butter and sprinkle with sugar. Place cinnamon roll slices close together in the pan and let rise until dough is doubled, about 45 minutes. Bake for about 30 minutes or until nicely browned.
  5. Meanwhile, mix butter, powdered sugar, and vanilla. Add hot water 1 tablespoon at a time until the glaze reaches desired consistency. Spread over slightly cooled rolls.


Sunday, April 20, 2014

Happy Easter!

I hope everyone is having a fabulous Easter! I also hope you have enjoyed my tips and recipes for easy Easter entertaining and continue to follow my blog for recipes as well as tips and tricks to living a preppy life!


Saturday, April 19, 2014

Glittered Easter Eggs

Hand painted Easter eggs are essential to any Easter celebration. Below is the tutorial, on how to create these sparkled eggs, and make your table a little more glam.


Materials:
12 Eggs
Egg blower or rubber ear syringe
Craft glue
Paint brush
Pin
Wax paper
Bowls and spoons

Steps:
  1. Blow out eggs. Over a bowl, pierce one end of a raw egg with a pin. Pierce other end, and use pin to enlarge hole slightly and break yolk. With your mouth or an egg blower, blow into smaller hole, forcing contents of egg through larger hole into bowl. Rinse inside of egg thoroughly; let dry.
  2. Brush craft glue onto egg. Gently set in bowl of glitter. Spoon glitter over egg, covering entire surface. Remove from bowl; set on wax paper to dry for 1 hour.

Strawberry Lemonade Layer Cake

Julia Child once said, “A party without a cake, is just a meeting”. Now, you would never want your guests to think your Easter party was “just a meeting”, so let’s make a cake for this Sunday. Southern Living Magazine makes the most glorious Strawberry Lemonade Layer Cake. The sweet-tart cake is simply to die for. I decided to serve it on my absolute favorite cake plate from Williams Sonoma, and I think the rabbit holding the plate gives it the most perfect seasonal touch.

This cake is ideal to serve at Easter brunch tomorrow, not only because of its perfect shade of pastel pink, but because the flavors are so light and reminiscent of Spring.


Strawberry Lemonade Layer Cake
 Ingredients:
1 cup butter, softened
2 cups granulated sugar
4 large eggs, separated
3 cups cake flour
1 tablespoon baking powder
1/8 teaspoon table salt
1 cup milk
1 tablespoon lemon zest
1 tablespoon fresh lemon juice
Shortening
Strawberry-Lemonade Jam (Recipe below)
Strawberry Frosting (Recipe below)
         
Directions:
  1. Preheat oven to 350°. Beat butter at medium speed with an electric mixer until creamy; gradually add sugar, beating until light and fluffy. Add egg yolks, 1 at a time, beating until blended after each addition.
  2. Stir together flour and next 2 ingredients; add to butter mixture alternately with milk, beginning and ending with flour mixture. Beat at low speed just until blended. Stir in zest and juice.
  3. Beat egg whites in a large bowl at high speed until stiff peaks form. Gently stir one-third of egg whites into batter; fold in remaining egg whites. Spoon batter into 4 greased (with shortening) and floured 9-inch round cake pans.
  4. Bake at 350° for 16 to 20 minutes or until a wooden pick inserted in center comes out clean. Cool in pans on wire racks 10 minutes; remove from pans to wire racks, and cool completely.
  5. Place 1 cake layer on a serving platter, and spread with about 1/2 cup Strawberry-Lemonade Jam, leaving a 1/2-inch border around edges. Spoon 1 cup Strawberry Frosting into a zip-top plastic freezer bag. Snip 1 corner of bag to make a small hole. Pipe a ring of frosting around cake layer just inside the top edge. Top with second and third cake layers, repeating procedure with filling and frosting between each layer. Top with last cake layer, and spread remaining Strawberry Frosting on top and sides of cake.
*Recipe from Southern Living Magazine, April 2014.

Strawberry-Lemonade Jam
Ingredients:
2 1/2 cups coarsely chopped fresh strawberries $
3/4 cup sugar $
1/4 cup fresh lemon juice $Click to see savings


3 tablespoons cornstarch
         
Directions:
  1. Process strawberries in a blender until smooth; press through a wire-mesh strainer into a 3-qt. saucepan, using back of a spoon to squeeze out juice; discard pulp. Stir in sugar.
  2. Whisk together lemon juice and cornstarch; gradually whisk into strawberry mixture. Bring mixture to a boil over medium heat, and cook, whisking constantly, 1 minute. Remove from heat. Place plastic wrap directly on warm jam; chill 2 hours or until cold. Refrigerate in an airtight container up to 1 week.
*Recipe from Southern Living Magazine, April 2014.

Strawberry Frosting
Ingredients:
1 (8-oz.) package cream cheese, softened
2/3 cup sugar, divided
2/3 cup chopped fresh strawberries
1 drop pink food coloring gel (optional)
1 1/2 cups heavy cream
3 tablespoons fresh lemon juice

Directions:
  1. Beat cream cheese and 1/3 cup sugar with an electric mixer until smooth; add strawberries and food coloring (if desired); beat until blended.
  2. Beat cream and juice at medium speed until foamy; increase speed to medium-high, and slowly add remaining 1/3 cup sugar, beating until stiff peaks form. Fold half of cream mixture into cheese mixture; fold in remaining cream mixture. Use immediately.
*Recipe from Southern Living Magazine, April 2014. 

Friday, April 18, 2014

Easter Brownie Bites

This week, it’s all about Easter entertaining. I know how stressful it can be around holidays, and that time is of the essence. However, if you’re hosting an event or bringing a dish, the goal is always to provide something delicious AND darling. Thankfully, the recipes I’ve been posting this week are both, with the added bonus of being easy and not too time consuming. Today, I’m continuing with these quick and cute recipes.

A double fudge, bite sized brownie, is topped with a creamy cream cheese frosting for the perfect balance of sweetness. Remember to pipe your frosting for a more finished look and sprinkle with Easter themed sprinkles. Perfect for large or small parties, these delectable Brownie Bites will leave you with an empty plate by the end of your event! (Since I know these will always be gone by the end of a party, I always hide 2 or 3 in a place like the vegetable drawer for a snack for later, that way no one will find them… don’t worry I won’t tell if you do the same!)


 Ingredients:
For the Brownies (This is the Hershey Chocolate brownie recipe)
1/2 cup flour
1/3 cup cocoa
1/4 teaspoon baking powder
1/4 teaspoon salt
1/2 cup butter
1 cup sugar
1 teaspoon vanilla
2 large eggs
For Frosting
4 oz cream cheese
4 oz butter, softened
1 tsp vanilla
2 cups powdered sugar
Yellow food coloring
Easter sprinkles

Directions:
  1. Preheat oven to 350 degrees. Spray a mini muffin tin with a generous amount of cooking spray. Sift together flour, cocoa, baking powder, and salt. Melt butter in a 10 - 12 cup saucepan over moderate heat. Stir in sugar and vanilla, and add eggs one at a time. Stir in dry ingredients, and stir in nuts. Spread smoothly in prepared pan. Bake 10 -13 minutes, or until toothpick inserted in the center just barely comes out clean.
  2. Cool in pan 15 minutes. Cover with rack and turn pan over. Remove Let stand until cool. While cooling start the frosting.
  3. In a large bowl combine cream cheese and butter and mix on high speed with an electric mixer until whipped. Add vanilla, and mix until incorporated.
  4. Slowly add powdered sugar, ½ cup at a time until smooth. Whip frosting on high until light and fluffy.
  5. Pipe frosting on cooled brownies, and sprinkle with sprinkles.


Easter Gift Tag Printable

Who has Easter baskets to gift? I teamed up with a fellow prepster, Keely at Even Keel (www.facebook.com/evenkeeldesign) who created these FREE printable Easter basket gift tags.

Between the bunnies, bowties and pearls, these preppy gift tags are a wonderful touch to add to your little lady or gents Easter basket.  


To view Even Keels Etsy store check out http://www.etsy.com/shop/evenkeeldesign


Thursday, April 17, 2014

Peeps On A Stick

This time of year I can't seem to get enough of one of my favorite seasonal candies, Peeps. In my opinion, Peeps are scrumptious in any form; on cupcakes, dipped in chocolate or my new personal favorite: on a Dunkin' Donuts donut.

What is better than a Marshmallow Peep? Marshmallow Peeps on a stick of course! This Easter candy favorite is served on a stick with miniature Reese Cups and adorned with springtime ribbon. An excellent party favor or dessert, these adorable creations are ideal to serve at a party because they don't need to be refrigerated, and don't require any added utensils.

This is another one of my favorite no-bake treat ideas and perfect for those who aren't comfortable cooking or who don't have time. This dessert is so simple; you can even put them together early on Easter morning!


Ingredients:
Different colored Peeps
Miniature Easter themed Reese’s Cups
Wooden Skewers
Ribbon

Directions:
  1. Take a wooden skewer and place Peeps and Reese’s Cups on skewer in a pattern. Tie ribbon on end of skewer for decoration.

*Depending on how many skewers you will want to make and how many Peeps you put on each skewer will determine the number of boxes of Peeps to buy. I suggest at least buying six boxes.

Wednesday, April 16, 2014

Easter Egg Nests

There are certain recipes I only make once a year, because they are either time consuming or only appropriate for certain seasons. These Easter Egg Nests are one of those recipes, but boy do I wish I made them more often. Similar to a Rice Krispie Treat, these cookies are made up of Chow Mein noodles coated in melted marshmallows and butter. Add a few chocolate eggs in the center and you’ll have a scrumptious Easter themed cookie, in less than 20 minutes.

This recipe is so simple, even the most inexperienced cook can put these together. No bake recipes are great for those who don’t have much time, but still want a delicious treat to serve guests. I know not everyone can cook or like to, but by trying out simple and easy recipes you’ll gain confidence in yourself as a cook and over time make more challenging things. Easter is this Sunday… so throw these cookies together before the weekend and impress your guests.


Ingredients: 
3 cups mini marshmallows
4 cups Chow Mein noodles
3 tablespoons butter 
1 bag of Cadbury mini eggs (You can use any small candy, i.e.: jelly beans, m&ms, etc.) 

Directions: 
  1. Combine marshmallows and butter over medium heat in a saucepan; stir until the butter and marshmallows have melted. Stir in the Chow Mein noodles, coat well. 
  2. Butter hands lightly and use approx. 1/4 cup mixture to form a compact ball. Make indention in the middle of each ball to resemble a bird's nest. 
  3. Place on wax paper and place egg shaped candies inside each nest.